
The carbon brush and spring pair found on the outside of the motor assembly is a genuine Dremel part. They transmit electricity to the motor's rotating section. They are also exposed to heat and friction, so eventually they will wear out. The carbon brush can be replaced easily, but you should unplug the scroll saw first. To prevent damaging the motor, you can replace the brush once you're finished with the saw.
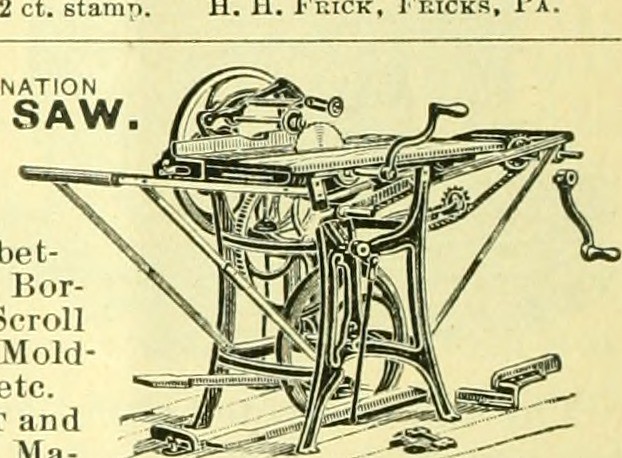
Dremel 1671
The Dremel 1671 scrollsaw is the predecessor to Dremel Moto-Shop. This scroll saw will allow you to make adjustments to your saw. The blade tension knob is located on the machine. After the blade pins have been installed, you should tighten your blade tension by one turn. Blades that are less likely to break will be held in tighter tension. You should lubricate your Dremel scroll saw 1671 regularly.
The Dremel scroll saw 1671 comes with a detailed user manual. This is a faithful reproduction of the original. The user manual will explain everything about the tool from how to set it up to how you can use it. The manual contains information about lubrication, maintenance, controls, and a parts listing. You will also find diagrams to help you understand the information. The Dremel1671 scroll saw manual contains the most important information.
Dremel Motor-Saw
The Dremelmotosaw scrollsaw is an ideal tool for beginners. It can serve two functions: a fretsaw and a scrollsaw. It can cut metal, plastic, or wood. It is best at making straight cuts. The tool is priced at around $100, and includes eight blades. The tool will be on the market in January 2013. You can also buy additional blades for $7 each.

The Dremel Moto-Saw scrollsaw is lightweight and easy to use. You can use it in either a stationary or handheld mode to do precise cutting. You can change the blades between the two modes for varying materials. For precise cutting, the Dremel Moto-Saw has a hold-down foot as well as parallel guide rails. It is also equipped with an ergonomic grip for comfortable use.
Dremel 1671: Review
The Dremel 1671 is an all in one tool that can handle a range of 5" blades. The pin-end is perfect for cutting wood upto two inches thick. The spiral blade is designed to allow for zero-degree rotation. The saw can be used for woodworking and other crafts as well, but the spiral blades will result in more vibrations and are not as effective at cutting metal. You should read the Dremel1671 review to learn more about the tools and the issues you need to avoid.
A Dremel 1671 review will highlight the many advantages of this scroll saw over the Dremel Moto-Shop. The manual includes detailed instructions on how to properly set up the scroll saw, how to lubricate it, and how to maintain it. The manual also contains a list of parts and diagrams that can be used as a reference. The Dremel 1771 is an all-in one tool that will be useful in any home or hobby workshop.
Dremel 1671 price
The Dremel1671 is a good choice if you want to cut wood in your own home. Its 5 inch blade cuts wood up to two inches thick. The switch case is plastic, and there's also a plastic shop-vac attachment. Dremel 1671 price includes all parts. SEARS.com is the best place to find the best deal.
The dremel 1671 will work with various 5" dremel blades. There are pin-end blades for cutting wood up to 2 inches thick. Another type of blade allows the user to rotate the blades in a zero-degree angle while working. The blades can either be pulled down or pushed up. You can switch out the spiral blade if you need it. The Dremel 1671 is priced between $75-$125. A second-hand item is less expensive than the Dremel 1671.
Dremel 1671 Maintenance
You can keep your Dremel 1771 in top condition by following these simple steps. The first step is to remove the charger. It's not recommended that the tool be handled by an average user. Next, use a plastic tool-vac attachment to clean and maintain the tool.
The Dremel 1671 comes with different 5" blades. Pin-end blades can be used to cut wood that's up to two inches thick. Spiral blades are used to cut metal and wood, and they can rotate 0o for easier work. The most simple way to change your blades is to pull the blade from the chuck of your tool and then take it off. Simply lift the blade or push it down to change it.
FAQ
What type of wood should I choose?
The most popular types of wood used in woodworking include oak, pine, birch, maple, cherry, mahogany, teak, poplar, redwood, and bamboo. Every type of wood is different and can have a unique look and feel that will affect the final product. Oak tends to be harder and darker than other woods. Birch is soft and light, and mahogany is denseer and heavier. There are two options: solid wood and veneers. Veneers are thin wood sheets that are glued together to form one layer.
Is there a way to start my own woodworking company?
Starting your own woodworking business isn't easy. There are many requirements and regulations that must be followed. It doesn't mean that you have to go through the entire process of starting a business. Many people decide to join established businesses. This will allow you to avoid paying membership fees and taxes.
How much money do you need to get going?
Each project is unique so there aren’t exact numbers. Here are some factors to help you estimate how much money you will need.
-
Materials cost
-
Tools and equipment
-
Time spent on the project
-
Hourly rate
-
What is your expectation for profit?
-
No matter if you are looking to hire someone
For those just beginning, it may be a good idea to start small with simple items like boxes and picture frames. As you gain more experience, you will be able tackle more complicated projects.
Where do you start when it comes to woodworking?
The best way to learn how to build furniture is by building furniture. While you will need tools and make mistakes, you will eventually master the art of building furniture.
Begin by choosing the project that you want to finish. It could be something as simple as a box or as elaborate as a full-scale entertainment center. Once you have settled on a specific project, it is time to find a woodworker in your area who is experienced in such work. Ask him or her for advice on what tools you'll need and where to find them. Ask if you can find someone who does this kind work.
Statistics
- The best-paid 10 percent make $76,000, while the lowest-paid 10 percent make $34,000. (zippia.com)
- Average lumber prices rose about 600 percent between April 2020 and May 2021. (familyhandyman.com)
- Overall employment of woodworkers is projected to grow 8 percent from 2020 to 2030, about as fast as the average for all occupations. (bls.gov)
- In 2014, there were just over 237,000 jobs for all woodworkers, with other wood product manufacturing employing 23 percent; wood kitchen cabinets and countertop manufacturing employing 21 percent. (theartcareerproject.com)
External Links
How To
How to stain hardwood
Staining wood can be described as a process where chemicals are applied to the wood surface. This causes the wood to take on a new color. This chemical reaction changes the wood's color from white to brownish. The most common type of wood used for staining is oak, although many other types of wood can be stained.
There are many options for applying stains to wood surfaces. One method involves mixing the stain and a solvent and then spraying it on the wood. Others use a solution made up of water and dye, which is then applied directly onto the wood. You can also mix stains with varnishes or paints so that they become part the finish coating.
Preparing your wood for staining is the first thing to do. To apply the stain, clean the wood completely. Sanding the wood removes scratches and imperfections. The next step is to choose the stain type you want. There are two main kinds of stains available: non-penetrating stains and penetrating. Penetrating colors penetrate deeper into wood than those that are non-penetrating. This makes them more suitable for darker colors, such as mahogany. Light colors such as maple work well with non-penetrating stain.
After deciding on the type of stain, you want to apply, prepare your tools. Paintbrushes are great for applying stain because they allow you to evenly spread the liquid across the surface. You should also have some handy rags to wipe up excess stains after you finish painting. If you plan on mixing the stain yourself make sure that you have enough containers to hold the different components.
Once you have prepared all your materials, it is time to clean the areas where you will stain the wood. To remove dirt and dust, use warm water and soap. Wipe the entire piece of furniture with a rag dampened with clean water. Be sure to get rid of all loose material, especially if staining is planned for darker wood.
Apply the stain next. Apply the stain by brushing or spraying it onto one side of the furniture. Slowly and carefully work your way along the grain to reach the opposite end. Make sure that the stain does not drip off the edge of the wood. Allow the stain to dry completely before you move on to the next step.
Clear polyurethane is used to protect the painted surfaces. Three coats of polyurethane sealing agent are required. Allow the third coat to dry overnight before sanding the final coat.