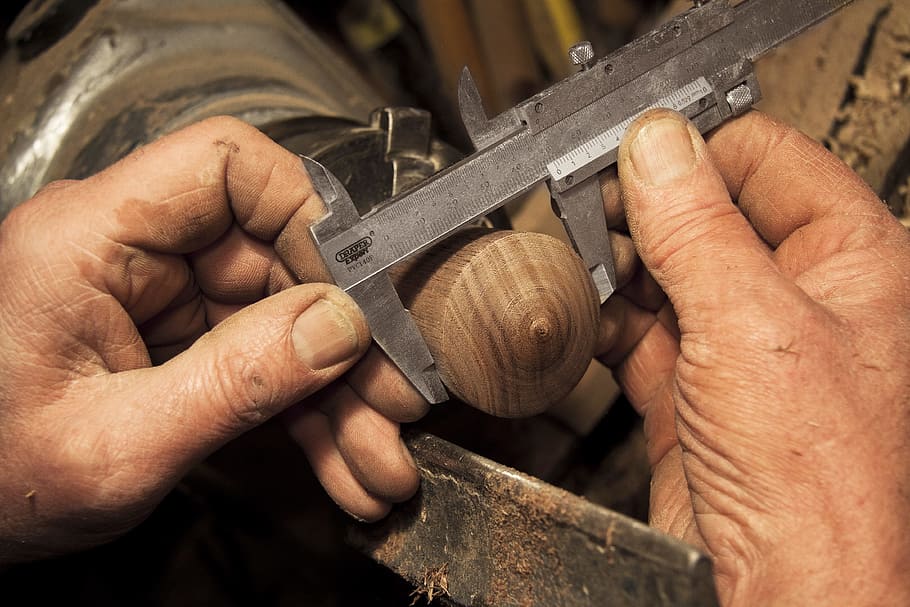
Philip Moulthrop began turning wood in 1979, learning his craft from his father, Ed Moulthrop. He cuts the green parts of trees in the southeastern region using a chain saw and a hand-forged lathe. He then finishes the bowl with several coats and refines it on his lathe. The entire process can take from four months up to one year. The bowls can be bought or given as gifts once they are completed.
Philip Moulthrop
Phillip Moulthrop's bowl is made from red leopard maple. Wood turning, which he invented, is a family tradition that has been passed down through three generations. Philip Moulthrop and his family have made many bowls that are now part of the permanent collections at several museums and private collections. Here are some of their most popular pieces. Continue reading for more information about this gifted artist.
The American artist Philip Moulthrop was born in 1947. In his 20s, he studied general arts and soon discovered a passion for woodworking. He bought his first lathe at age 16 and slowly expanded his equipment. He was an innovator in his field, creating beautiful turned vessels that were well-received by the art community and the United States president. His work was soon recognized and he started selling his pieces at local craft fairs and galleries. He also began to receive international recognition.
Matt Moulthrop
The Matt Moulthrop Bowls are a beautiful example of Georgia's rich wood-turning tradition. The artist was born and raised in Atlanta. He received his BA from Georgia Tech and MBA from Georgia Tech. He worked for a few years in 9-to-5 jobs but never lost his love of woodturning. He was even recognized nationally for his bowls. His works are shown at the ASU Art Museum (the Carter Center) and Racine Art Museum (the Racine Art Museum).

The Moulthrops have been recognized as world-class wood-turners, with works placed in prominent collections in the United States and abroad. Moulthrop's own pieces are held in the Renwick Gallery of the National Museum of American Art. His bowls are collected by collectors worldwide. He gave each photographer an autographed copy of his family's memoir during a Smithsonian photo shoot.
Ed Moulthrop
Moulthrop began making bowls in the 1970s. He soon received a scholarship from Princeton University to study architecture. Moulthrop decided to take up woodturning after spending a whole year in Vietnam. His large-scale, hand-turned bowls have been recognized worldwide and are kept in prominent museums like the Museum of Arts and Design and the White House Collection of American Crafts. These bowls were made from domestic woods, and are polished to a clear shine.
This rare Ed Moulthrop box measures nine inches by fourteen inches. It is made from wild cherry. These wood bowls are available at Gump's San Francisco. There are many other pieces of Ed Moulthrop's wooden bowls on display. The best way to learn about the artist's work is to visit the exhibition. His work can also be found in a beautifully printed catalog. It is possible to buy the bowls in museums, but it is best to see his studio in person.
The Eagle & Phenix Dam Series
This limited edition collection of moulthrop bows uses wood from Eagle & Phenix Dam. The dam was built in Columbus, Georgia. These bowls are handcrafted by Phillip Moulthrop and Matt Moulthrop and have traces of their history. They are available for bid during regular museum hours, and a portion of the bowls will be auctioned off live.
The Moulthrop family has contributed to the growth of wood-turned bowls in Georgia. The museum proudly displays works by all three generations of the Moulthrop family, who have been turning bowls for more than five decades. Many of these pieces are extremely prized because they have large sizes and smooth polished surfaces. This exhibit features his mosaic bowl technique that involves glue and thin branches adhering to a turned dish.
Matt Moulthrop's work
Matt Moulthrop, the son and daughter of Philip Moulthrop (and Ed Moulthrop), grew up with woodturning. From a young age, his father taught him woodturning and he has never stopped loving it. After completing his BA at the University of Georgia and his MBA at Georgia Tech, Matt turned wood as a career. He is the third generation to create wooden vessels. His work is displayed in many prominent art institutions such as the ASU Art Museum, Carter Center and the Carter Center. He is currently working on commemorative pieces for the Georgia Tech Alumni Association's 100th anniversary.
Georgia is not home to the wood he turns. He often travels to exotic wood in other parts of the globe. He creates unique pieces by turning trees from around the globe with tools and a hand-forged, lathe. He uses wood from the Southeast as well as exotic locations like underwater forests and volcanoes to create his pieces. Check out his work if you enjoy it!
FAQ
What kind tools do carpenters use to build?
A hammer is the most commonly used tool by carpenters. A hammer is used for pounding nails into wood. It is also used to help hold pieces together while working on a job. Other tools include clamps, pliers, screwdrivers, measuring tape, pencils, saws, drills, and wrenches.
How can my shop be organized?
To keep your workshop tidy and organized, you should first create a place for tools storage. You want your tools to stay clean and free from debris and dust. To hang accessories and tools, use pegboard hooks.
How much do hobbyists need to invest in starting a business?
A lot of capital is required to purchase the necessary supplies and tools if you want to start your own woodworking shop. It's a good idea to buy a small tablesaw, drill press and circular saw. These items won't break the budget and aren't expensive.
How can I determine which tools are most suitable for me?
When shopping for tools, it helps to think about your needs and preferences. What do you prefer: metal or plastic handles? What size of nails and screws do your hands use most? Are you more comfortable using power tools than hand tools?
What tools should you start with to become a woodworker
Woodworking is an art that takes patience and practice. It takes time for you to master the different techniques and tools that are required to woodwork.
There are many different types of woodworking equipment available on the market today. Some people prefer to use power tools while others prefer manual tools.
It's your choice. But you should ensure that you pick the right tool. You might start with a simple set of tools if you don't have much experience.
You could also try learning how to use a router which is used to cut intricate shapes into wood. You can find these at most hardware stores.
What would you recommend as a starting material for woodworking?
You can start with softwoods like pine or poplar. When you feel confident with these two, move on towards hardwood.
Where do I start with woodworking?
Learning how to build furniture is the best method. While you will need tools and make mistakes, you will eventually master the art of building furniture.
Choose a project that interests you. You can make a simple box or a large entertainment center. Once you have chosen a project, locate a local woodworker who is skilled in this kind of work. Ask them for suggestions on the tools you will need and where to buy them. Ask if you can find someone who does this kind work.
Statistics
- Woodworkers on the lower end of that spectrum, the bottom 10% to be exact, make roughly $24,000 a year, while the top 10% makes $108,000. (zippia.com)
- Overall employment of woodworkers is projected to grow 8 percent from 2020 to 2030, about as fast as the average for all occupations. (bls.gov)
- The U.S. Bureau of Labor Statistics (BLS) estimates that the number of jobs for woodworkers will decline by 4% between 2019 and 2029. (indeed.com)
- If your lumber isn't as dry as you would like when you purchase it (over 22% in Glen Huey's opinion…probably over 10-15% in my opinion), then it's a good idea to let it acclimate to your workshop for a couple of weeks. (woodandshop.com)
External Links
How To
How to stain wood
Staining wood refers to applying chemicals to wood's surface. This chemical reaction causes the wood to change in color. The wood will turn from white to brownish-red due to the chemical reaction. The most common type of wood used for staining is oak, although many other types of wood can be stained.
There are many options for applying stains to wood surfaces. Some methods involve mixing the stain with a solvent (such as turpentine) and then brushing or spraying the mixture onto the wood. Some methods involve a mixture of water and dye that is applied directly to the wood. You can mix stains into varnishes or paints to make them part of your finish coat.
Preparing the surface is the most important step in staining wooden surfaces. To apply the stain, clean the wood completely. Sanding can smoothen out scratches and uneven spots. You must then decide on the type of stain that you wish to use. There are two main types of stain: non-penetrating and penetrating. Penetrating colors penetrate deeper into wood than those that are non-penetrating. This makes them more suitable for darker colors, such as mahogany. Non-penetrating stains work best with light colors like maple.
After you've decided what type of stain to apply, get ready for your tools. You can use a paintbrush to apply stains. This allows you spread the liquid evenly over the surface. After you're done painting, make sure to have some rags handy to remove any excess stain. If you plan on mixing the stain yourself make sure that you have enough containers to hold the different components.
After you have prepared the materials, you can clean the area where you want to stain the wood. Use warm water and soap to clean away dirt and dust. Use a dampened rag and clean water to wipe the furniture. Take care to remove all debris and dirt, especially if you are planning on staining darker wood.
Next, spray the stain. Next, apply the stain to the furniture by starting at one end. Move slowly and carefully along the grain of your wood until you reach its opposite end. Keep the stain from dripping off the wood's surface. Before proceeding to the next step, let the stain dry thoroughly.
To protect the painted surface, apply a coat of clear polyurethane sealant. Apply three coats polyurethane sealer. Allow the third coat, which should dry overnight, to dry before sanding.